Tkinter --> by myCODEnotein
Importing tkinter and Starter Template
Importing Tkinter
from tkinter import *Importing ttk
For new tkinter widgets you need to import ttk by the following command
from tkinter import ttk# Click the link for :
ttk notes
Starter Template
Get Full Version Of Starter Template at:
This Link
from tkinter import *
root = Tk()
root.mainloop()
Methods Of Tk Class / Configuring root
Setting Up Root Title
root.title("title of gui window")Getting ScreenWidth and ScreenHeight
root.winfo_screenwidth() # returns screen width
root.winfo_screenheight() # returns screen height
Setting Up root geometry
root.geometry("{screenWidth}x{screenHeight}")# Optional
root.geometry("{screenWidth}x{screenHeight}{x_coordinate}{y_coordinate}")#For Example
1. root.geometry("1100x500+100+5") # Opens window at (100,5)
2. root.geometry("1100x500-29+5") # Opens window at (-29,5)
3. root.geometry(f'{root.winfo_screenwidth()}x{root.winfo_screenheight()}')Making The window transparent
root.attributes("-alpha",value)
# value lies between 0 and 1
# 0 is fully transparent and 1 is fully visible
Making the window remain at top of all windows
root.attributes("-topmost",value) # value=1 or value=0value=1 signifies that window must be at the top of other windows always
value=2 signifies that window may or may not be at the top of other windows alwaysMaking the GUI full screen
root.attributes("-fullscreen",value) # value=0 or value>0value=0 signifies that window is not in full screen mode
value=1 signifies that window is in full screen modeTo know more attribute of root
# You can run
root.attributes()
# returns the attributes of the root window.
To minimize the window through code
root.iconify() # Minimizes the windowroot.deiconify()
# Pops up the window at the top
# If window is minimized then displays the windowTo destroy the window/gui
root.destroy()To remove the title bar of the window
root.overrideredirect(True)To call a function when user press the cross on title bar
root.protocol("WM_DELETE_WINDOW",  function)
# this function is called when a user is exitting the window.
# Note: This will override the default exit option and then you can to call root.destroy() if you want to destroy the window
Widgets in Tkinter
myFrame = Frame(master,**options)myLabel = Label(master,**options)myButton = Button(master,**options)myMenu = Menu(master,**option)myEntry = Entry(master,**options)myText = Text(master,**options)myCanvas = Canvas(master,**options)myScrollbar = Scrollbar(master,**options)# To know **options , you can run:
Widget.keys() # returns all the **optionsNote that:
width and height options as
characters while
Frame , canvas like widgets treat
it as pixels
Basically , among text and frame of width 100
,text appears to be of larger width than
frame. Same with height.
Some Common Widget Options
bg or background - sets the background color
fg or foreground - sets the foreground color
# you can't use bg or fg option in .config method
# there you need to give background/foreground for your purpose.
font - sets the font
# syntax:
1.either a tuple: (font_family,font_size,"bold"/"italic")
2. or a string : "font_family,font_size,bold/italic"
# you can also set any one property if you want
Some font families: helvetica , consolas
# for example
font="consolas 18 bold"
# (or)
font=("consolas","18","bold")
width,height # takes integer values
cursor - specifies the cursor when arrow is on the widgets.
You can find cursor values at
This Link
Grid , Pack and Config methods
Pack
# syntax
widget.pack(**options)
# To know **options you can run
help(widget.pack)Grid
# syntax
widget.grid(row=ROW_NO,column=COLUMN_NO,**options)
# To know **options , you can run:
help(widget.grid)Note that:
Pack and grid cannot be used together.
Basically , widgets sharing same parent/master
can either use pack or grid.
.config Method in tkinter
#syntax
widget.config(**options)
Used to change/add an option later in the code for a widget.In this method , to set background color , instead of bg option
background option must be used.
Same with foreground color.

tkraise method in tkinter (related to grid)
When this method is used
Suppose a widget is having same row and column as another widget gridded under same parent.
Then tkinter will (by default) show the widget which is gridded later in the code.
Hence , this method is used when two widgets with same row and same column are gridded and one needs to be raised to bring forwards/upwards
syntax
widget.tkraise()Events in tkinter
Get a button which changes its properties on hover at
This Link
# syntax
widget.bind("<event>",func=function)

# Note that tkinter passes an argument e to the function when the event occurs.
The Function is something like
def function(event):
	# print(dir(event)) to know the properties of the event
	# your code here
Use Of Lambda Function
To give argument to the function you can use lambda function.
# For example:
widget.bind("<event>",func=lambda event:function(arguments))

# Note that in this case event argument is passed to lambda function.
# (which is necessay)
# You can pass that event to the function as well
Returning break (related to keypress events and more)
Suppose,you want to bind your text widget
with an event "Control-a".
You bind it , but along with your function
tkinter also selects the whole text in the widget
,which is its default function.
Now you want that this thing does not happen
so for this you need to see the solution
You need to return: "break"
in your function which you hade binded with
the control-a event.def myFunction(event):
# your code
return "break"
myTextWidget('<Control-a>',func=myFunction)
# This code will just prevent tkinter from selecting the whole text in text widget.You can also do the same with other events .
Some properties of event argument which tkinter passes to the function
# you can simply run: print(dir(event)) in the function to know all properties.Property:
event.delta
The delta refers to the direction and magnitude where the mouse wheel was rotated.Note the value is not a screen distance but are units of motion in the mouse wheel.Typically these values are multiples of 120. For example, 120 should scroll the text widget up 4 lines and -240 would scroll the text widget down 8 lines.
# To scroll any scrollable widget within code you can do
widget.yview_scroll(number,what)
Shift the y-view according to number.
what = "units" or "pages"
# for example
myText.yview_scroll(10,'units') # scrolls pages 10 units
myText.yview_scroll(1,'pages')Mouse events
"<Enter>"
# Mouse enters any widget (mouse hover)
"<Leave>"
# Mouse leaves any widget (mouse leave)
Mouse Click Events
"<Button-1>"
# Left clicked on a widget
"<Button-2>"
# Middle clicked on a widget (now a days mouse does not have middle button)
"<Button-3>"
# Right clicked on a widget
Keyboard events
"<Key>"
# Used pressed a key
"<KeyRelease>"
# User released the key
Binding two or more key presses
You can also bind keypresses like ctrl+c,ctrl+d,shift+enter..etc
#for example:
"<Control-Key-1>" # event : ctrl+1
"<Control-1>" # event : ctrl + left click
"<Alt-a>" # event : alt + a
"<Shift-a>" # event : shift + a
Note that you can write any number/key infront of control,shift,...etc
But while using numbers , if you want to use number 1 for example
then you need to do "{Whateverkey}-Key-1".
Directly writing 1 without key makes tkinter think that you want mouseclick event with {Whateverkey} event.This thing is also explained in a great stackoverflow article
At this link
Some more events
"<FocusIn>"  - when a widget gets focus
"<FocusOut>"  - when a widget loses focus
"<<ComboboxSelected>>" - when Combobox is Selected
"<<NotebookTabChanged>>" - when tab in notebook widget is changed.
"<Return>" -  user pressed enter on a widget
"<Left>" -  user pressed left key on a widget
"<Right>" -  user pressed right key on a widget
"<Up>" -  user pressed up key on a widget
"<Down>" -  user pressed down key on a widget
To know more events
#RUN:
help(widgetName.bind)
Generating an event in tkinter
# If you want to generate an event in tkinter
# syntax:
widget.event_generate(Event)you want that left key press event occurs on entry widget
then you can do that by the following codeentryWidget.event_generate("<Left>")Menu Widget in Tkinter
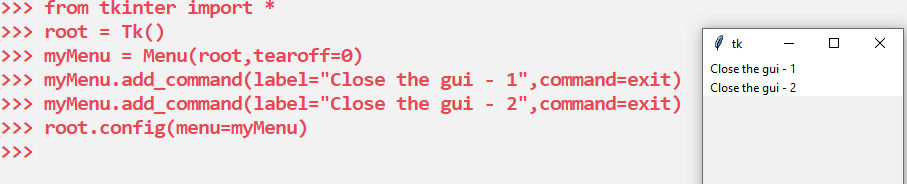
Creating menu widget instance with options
myMenu = Menu(root,tearoff=0)Adding the Menu to the Main Window
root/master.config(menu=myMenu)Add Cascade Function Of menu widget
myMenu.add_cascade(label="Name of menu",menu=menuObject)Adds another Menu instance to the myMenu instance as shown in img below.
Add Command Function of menu widget
# Let us give commands to file menu shown in the image
menuBar.add_command(label="Close",command=exit)
This function is used to create options in vertical direction in menu. (In this case) If user clicks the option ,the command 'exit' will be executed.
What happens when you use add_command with myMenu and not with child menu
Adding a separator between the menu Options
#syntax:
menuInstance.add_separator()

example: file.add_separator()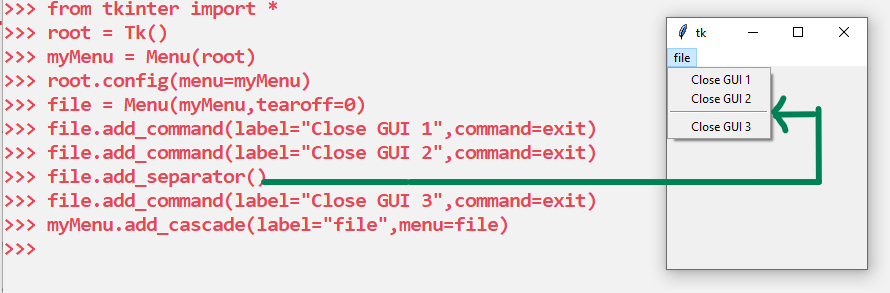
Listbox in tkinter
You can give scrollbar to listbox
myListbox = Listbox(master,**options)
Inserting values in listbox
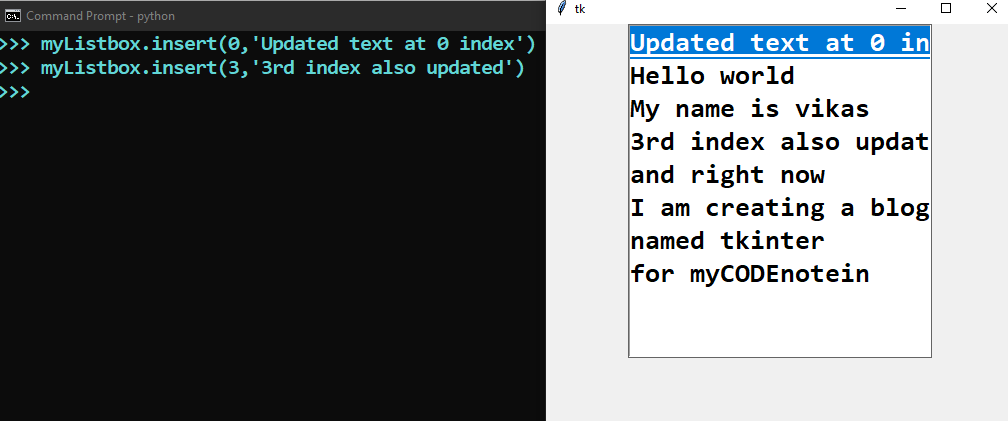
myListbox.insert(index,value)
# index = any integer
# value = text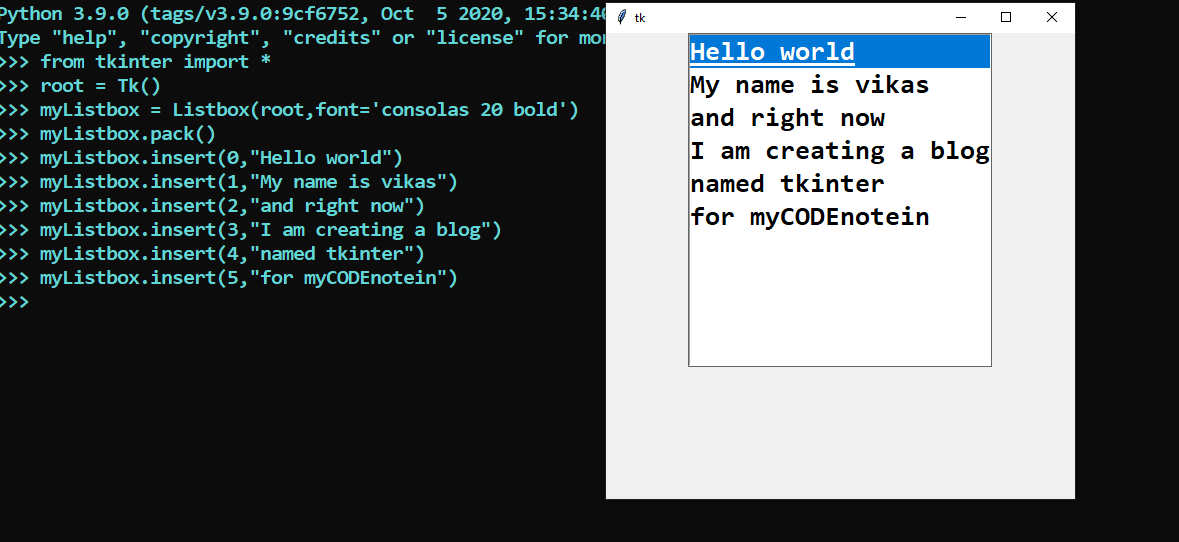
What will happen if you insert value at the index which already consists a value
Listbox Methods
myListbox.get(index)myListbox.delete(index)Text widget in tkinter
Creating the text widget instance
myText = Text(master,**options)
# Note: frame of width 100 is smaller than text of width 100. Similar with height
Insertontime and insertofftime options
#time for which insertion cursor is on the screen
myText.config(insertontime=num) # default num=300
#time for which insertion cursor is not on the screen
myText.config(insertofftime=num) # default num=600Indexing in text widget - tkinter
# basic indexing
index: '{lineNumber}.{columnNumber}'
# End index of a line
index:'{lineNumber}.end'# Index of insertion cursor
index: 'insert'# Index of selected text
index: 'sel.first' # for first index
index: 'sel.last' # for last index
# Similarly for any custom tag you can do
index: '{tag}.first' # for first index
index: '{tag}.last' # for last index
# Index of line start and line end
index: '{index} linestart'
index: '{index} lineend'
# Index of word start and word end
index: '{index} wordstart'
index: '{index} wordend'# Adding and subtracting to index
index: '{index} +10c' # adds 10 characters to index .
index: '{index} +2l' # adds 2 lines to index .
# you can also subtract and use both of them together if required.# index method
# for ex: if you want the index of insertion cursor in 'line.col' format
insertIndex = myText.index('insert')# for comparing two indices
myText.compare(index1,operator,index2)Common Methods
myText.get(index1,index2) # Returns text from index1 to index2myText.insert(index,text,*args) # inserts text on index
# In *args you can give tag names and tkinter will put those tags on the inserted text.myText.search('string/pattern',startIndex,**kwargs)
# if the string/pattern is found then returns the index of the first character of the string/patternmyText.replace(startIndex,endIndex,string,*args)
# replaces the text between startIndex and endIndex with string.
# In *args you can give tag names and tkinter will put those tags on the inserted text.myText.delete(startIndex,endIndex) # default endIndex=None
# Delete the characters between startIndex and endIndex (not included).Tags in tkinter
What are tags?
Tags are like classes in tkinter.
To changes font,foreground color,background color
of a certain portion of text , you can do that
with tags.
You can set a tag between two indices and then config tag to changes **kwargs of the region comprising that tag.
# There can be multiple tags as well
myText.tag_add(tagName,startIndex,endIndex)
# tagName can be user defined
# tkinter defined tag: 'sel'
myText.tag_config(tagName,**options)
# **opt includes basic text widget options like
font,background,foreground,selectbackground ... etcmyText.tag_remove(tagName,startIndex,endIndex) # default endIndex=None
# Remove tag "tagName" from all characters between startIndex and endIndex.myText.tag_delete(*tagNames)
# deletes all tagNames
# all the text portions comprising that tag are made normalSome more tag methods
myText.tag_names(index) # default index=None
# Return a list of all tag names at that index.
myText.tag_ranges(tagName)
# Returns a list of the following form
list = [start-1 , end-1 , start-2 , end-2 .... start-N,end-N]
this means that tag is applied between (start-1,end-1) , (start-2,end-2) , .... , (start-N,end-N)Marks in text widget
# What are marks?
marks are like tag with startIndex=endIndex.
They are used to mark a specific index in text widget.
marks are user defined.
# There can be only one mark of one name but you can always change its position
"insert" is also a mark made by tkinter
"insert" is a mark which represents where the character will be placed in text widget when a user presses a key.myText.mark_set(markName,indexToPlace)myText.index(markName) # returns index of markNamemyText.mark_names()
# return all mark namesmyText.mark_next(index)
# returns first mark present after given indexmyText.mark_previous(index)
# returns first mark present before given indexmyText.mark_unset(*markNames)
# deletes all mark namesSetting up gravity of mark
myText.mark_gravity(markName,direction)
# direction='left' or 'right'
# See the below video to understand what happens with this method
A video showing mark_gravity effect
Great Resource for text widget
Scrollbar widget in tkinter
To get scrollbar widget templates (free) click
This Link
myScroll = Scrollbar(master,**kwargs)Required **kwargs
command parameter must be set.
#for ex:
widget.yview # just replace the widget by the widget instance
Settings Required for widget instance
#You also need to define yscrollcommand of the widget
widget.config(yscrollcommand=myScroll.set)
Text Widget With Built In Scrollbar
Importing the widget
from tkinter import scrolledtext as sCreating the widget
myScrolledText = s.ScrolledText(master,**options)
# creates a widget text widget with scrollbar which is built in.
**options are basic text widgets options like : font,width,height,background etc.
Setting Variable Values In Tkinter Widget
For example: you want to create a label in tkinter which changes its text . You can do that either by .config method described above (or) use variable values in tkinter
Similarly you might create an entry widget and want to get its text.
For that you can just set its textvariable keyword argument to the variable
and use variable.get() to get the value of the entry.
4 types of variable values which can be set
BooleanVar() # accepts True or False only
StringVar()  # accepts any string value
IntVar()     # accepts any integer value
DoubleVar()  # accepts any floating point value
Syntax of Variable
variable = VariableValue(value=SOME_VALUE)intVariable = IntVar(value=20)
boolVariable = BooleanVar(value=True)
strVariable = StringVar(value="myCODEnotein is best")
doubleVariable = DoubleVar(value=1.2)How To Apply to a Widget
you can give widgets like Label,Button
a keyword argument : textvariable and set that to variable
# example
Label(master,textvariable = variable)
Button(master,textvariable = variable)
Entry(master,textvariable = variable)
Some widgets like OptionMenu needs to be given a variable as an argument.
Set And Get Method Of VariableValue
# To set/change the value of variable
variable.set(value)
# To get the value of variable
variable.get()Entry Widget In tkinter
myEntry = Entry(master,**options)Taking one liner input in tkinter.
You can bind the widget with events
as well.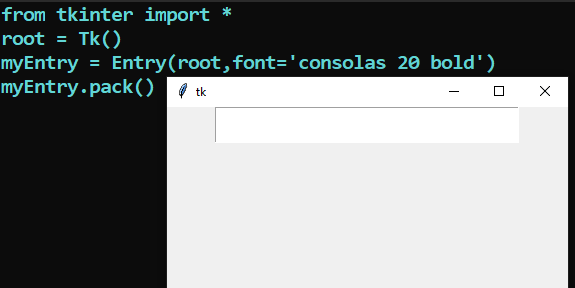
# All **options
['background', 'bd', 'bg', 'borderwidth', 'cursor', 'disabledbackground', 'disabledforeground', 'exportselection', 'fg', 'font', 'foreground', 'highlightbackground', 'highlightcolor',
'highlightthickness', 'insertbackground', 'insertborderwidth', 'insertofftime', 'insertontime', 'insertwidth', 'invalidcommand', 'invcmd', 'justify', 'readonlybackground', 'relief', 'selectbackground', 'selectborderwidth', 'selectforeground', 'show', 'state', 'takefocus', 'textvariable', 'validate', 'validatecommand', 'vcmd', 'width', 'xscrollcommand']
Using Entry Widget From ttk module
# from tkinter import ttk
myNewEntry = ttk.Entry(master,**options)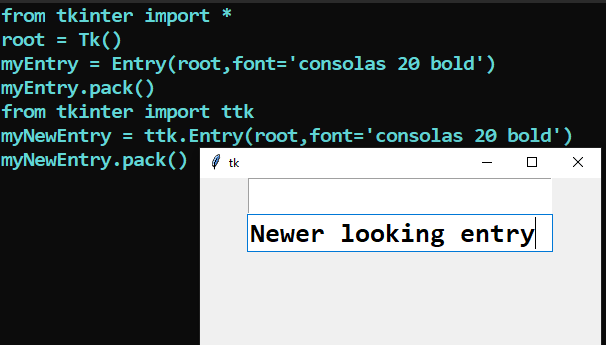
# All **options of ttk.Entry
['exportselection', 'font', 'invalidcommand', 'justify', 'show', 'state', 'textvariable', 'validate', 'validatecommand', 'width', 'xscrollcommand', 'foreground', 'background', 'takefocus', 'cursor', 'style', 'class']
Methods of entry widget
# To insert text of entry widget
myEntry.get()
myEntry.insert(index,text)
# inserts text at index
'''
because entry is one liner
indexing is just like a string.
'end' = end/last index of the entry widget
'''# To delete text of entry widget
myEntry.delete(index1,index2)
# deletes text from index1 to index2 (index2 not included)OptionMenu Widget in tkinter
myOptionMenu = OptionMenu(master,variable,value,*values,**options)
# arguments explained in desc section
To create a dropdown box , OptionMenu widget is used.
"""
variable can be StringVar,IntVar,BooleanVar or DoubleVar
value is the inital value of the box
*values are the list/tuple of values in dropdown box
**options include command which execute when user presses a value
"""
# To set default value you can set the variable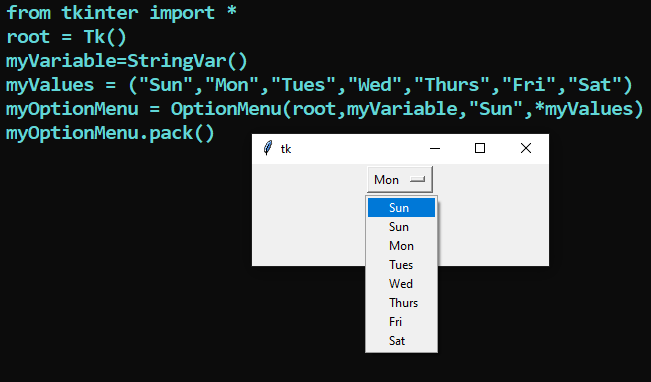
You can also use ttk.OptionMenu for an OptionMenu with better design
Other **options
['activebackground', 'activeforeground', 'anchor', 'background', 'bd', 'bg', 'bitmap', 'borderwidth', 'cursor', 'direction', 'disabledforeground', 'fg', 'font', 'foreground', 'height', 'highlightbackground', 'highlightcolor', 'highlightthickness', 'image', 'indicatoron', 'justify', 'menu', 'padx', 'pady', 'relief', 'compound', 'state', 'takefocus', 'text', 'textvariable', 'underline', 'width', 'wraplength']To get the current value
variable.get()To set the OptionMenu Value
variable.set(value)Using OptionMenu With Command Option
Tkinter passes the selected value to the function/command you have given to the OptionMenu
Hence function is something like:
def Command(value):
	# value = user selected value
	# your code here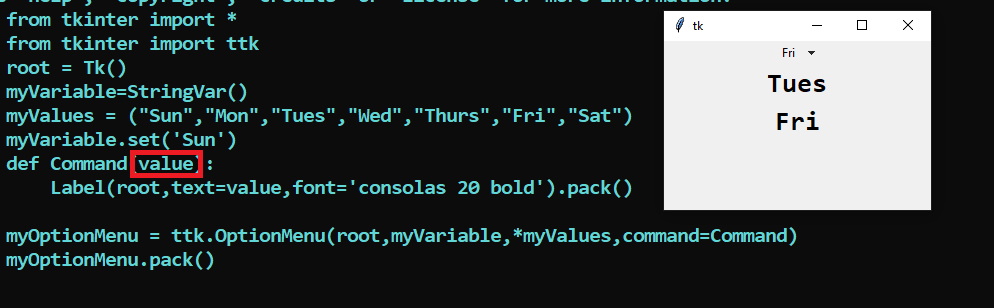
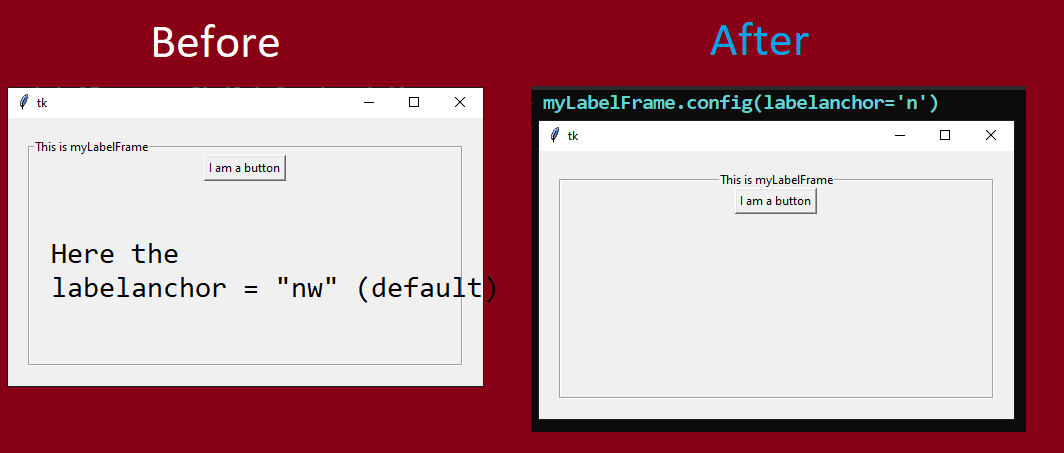
LabelFrame widget in tkinter
Creating the widget (with example)
A labelframe widget produces a frame which has
label on it as shown in the below image.
myLabelFrame = LabelFrame(master,text='This is myLabelFrame',**options)
# myLabelFrame.pack/grid/place()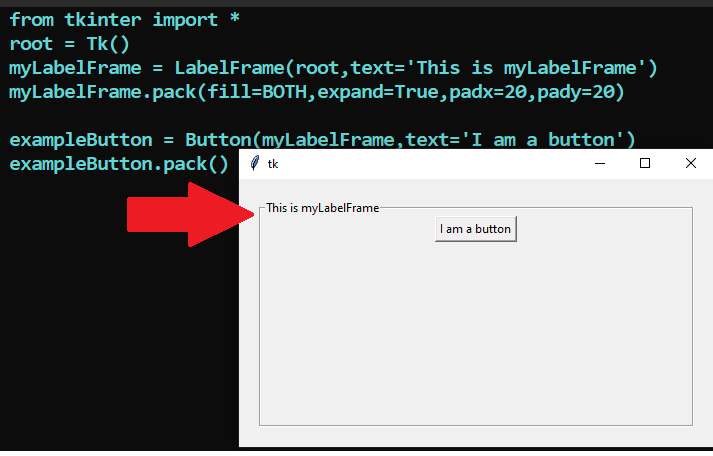
**options of the widget
['bd', 'borderwidth', 'class', 'fg', 'font', 'foreground', 'labelanchor', 'labelwidget', 'relief', 'text', 'background','bg', 'colormap', 'container', 'cursor', 'height', 'highlightbackground', 'highlightcolor', 'highlightthickness', 'padx','pady', 'takefocus', 'visual', 'width']labelanchor can be e, en, es, n, ne, nw, s, se, sw, w, wn, or ws
Message box in tkinter
Importing messagebox from tkinter to use it
from tkinter import messageboxVarious methods:
showinfo , showwarning , showerror , askquestion , askokcancel , askyesno
messagebox.showinfo("title of window","message to show")
# this function simply pops ups a dialog box which shows a message to user (thats it)
messagebox.showwarning("title of window","message to show")messagebox.showerror("title of window","message to show")Rest are same . The only difference is in rest functions yes and no (similar types) buttons will appear and some will return True,False,Yes etc.
FileDialog In tkinter
Importing filedialog
# firstly importing filedialog is required
from tkinter import filedialog
Some Methods Of FileDialog
'askdirectory', 'askopenfile', 'askopenfilename', 'askopenfilenames', 'askopenfiles', 'asksaveasfile', 'asksaveasfilename'
Understanding **options for dialogs in filedialog
# Understanding filetypes
fileType defines filetypes which can be saved or opened
filetypes = [('PYTHON FILE' , '*.py') , ('ALL FILES','*.*')]type(filetypes) = list/tuple (always)
type(elements in filetypes) = list/tuple (always)
Element : ("Name Of Type (user defined) ", "Filename.FileExtenison")
'''
To allow user to select any filename
you can replace Filename by *
which tells tkinter to allow any name.
Similarly to allow any file extension
you can replace FileExtenison by *
'''Other **options include :
initialdir : initial dir in which dialog box has to be opened
initialfile : the file selected upon opening of the dialog
title : title of the dialog window
defaultextension : default extension to append to file (save dialogs)
multiple : when true, selection of multiple items is allowed
Use this if you want multiple folders/files to be selected
Asking for a directory
Method used: askdirectory
# syntax
directory = filedialog.askdirectory(**options)
# directory = directory selected by user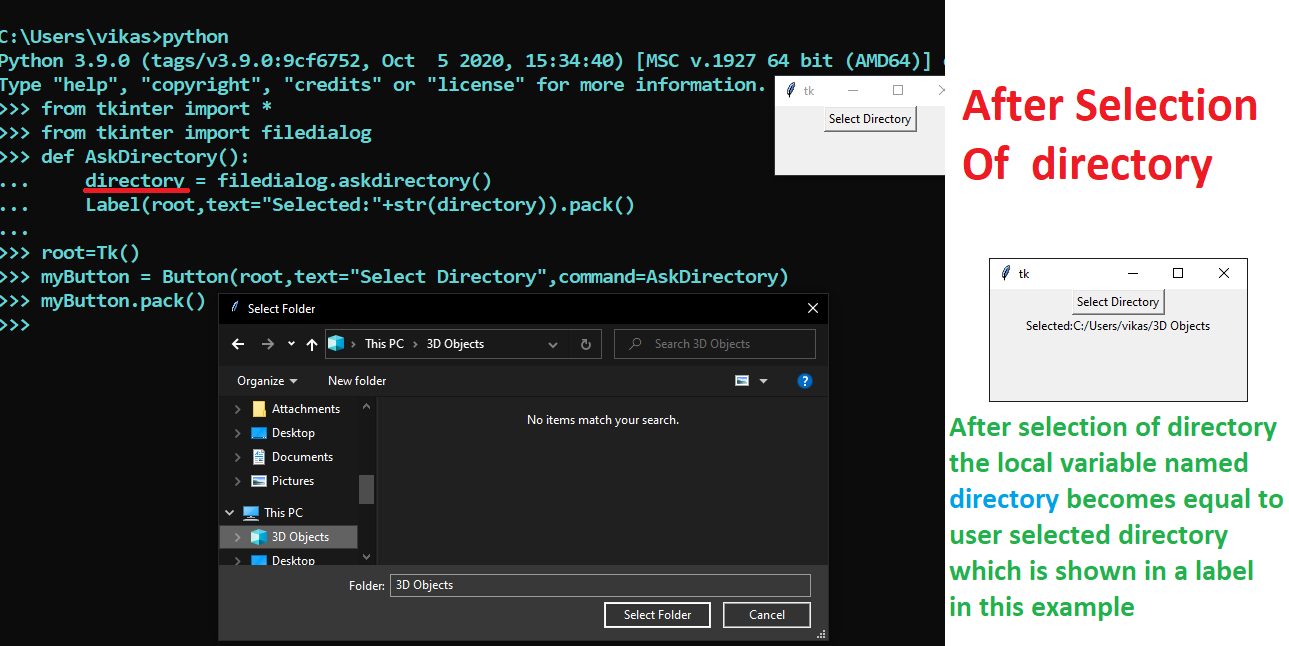
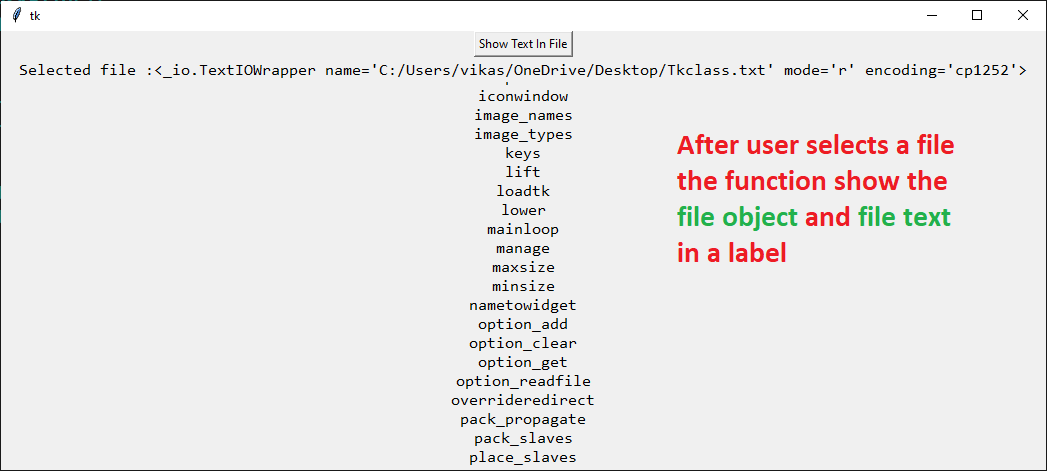
Asking for files with different methods of filedialog
#1
file = filedialog.askopenfile(mode,**options)
# mode = "r" by default
# file = file object opened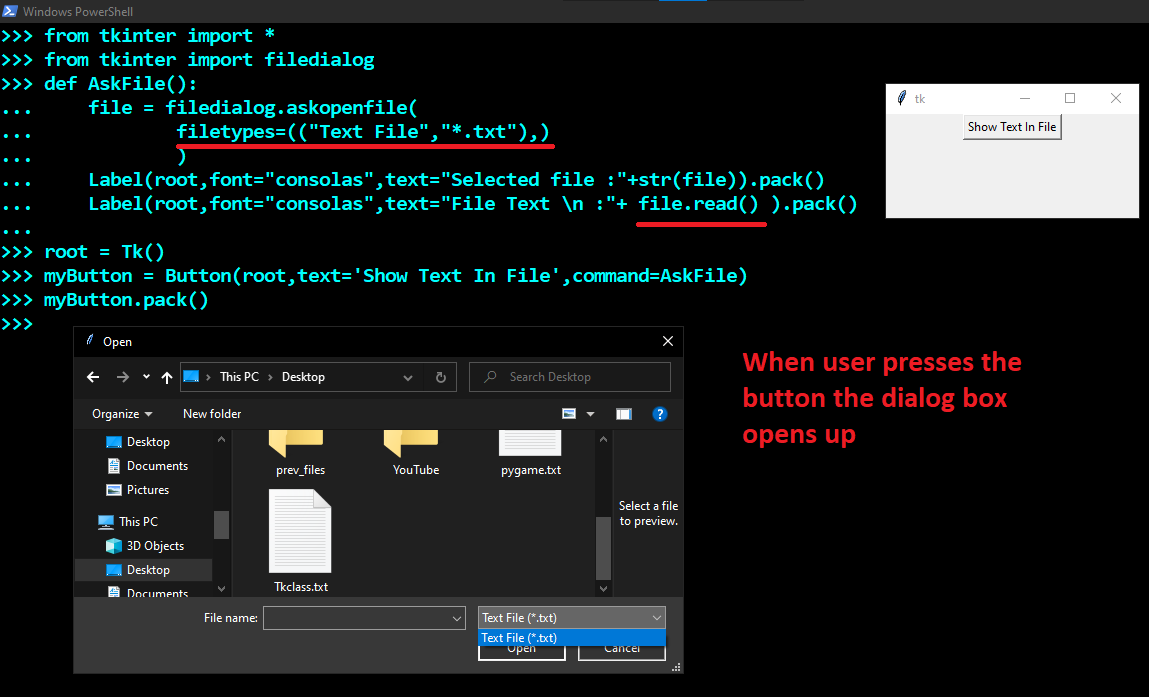
Toplevel Widget In tkinter
myTop = Toplevel()
# creates another window . you can use that window to create custom dialog boxes and any other thing.
# This works same as any normal Tk class instance would.
ColorChooser in tkinter
Importing ColorChooser
from tkinter import colorchooser # importing explicitly is requiredAsking for color
myChosenColor = colorchooser.askcolor()
# returns chosen color (or) None
# myChosenColor = (rgb value , hex value)
# (rgb value is in tuple)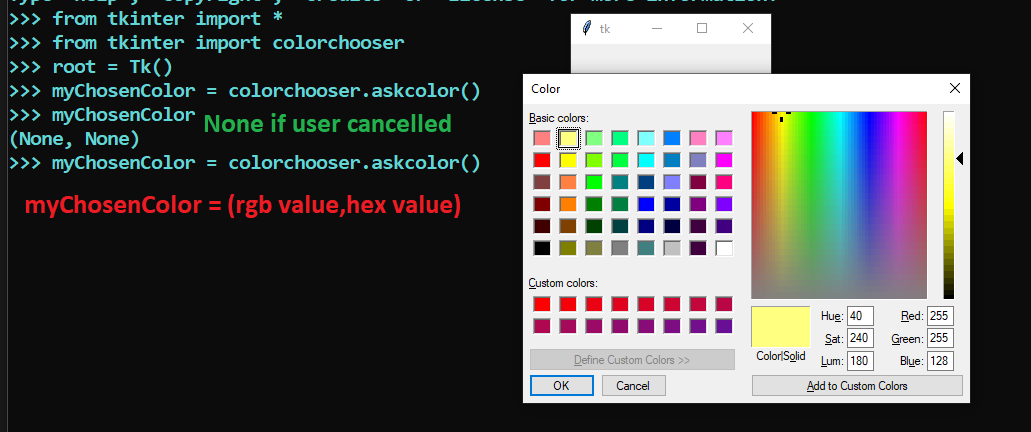
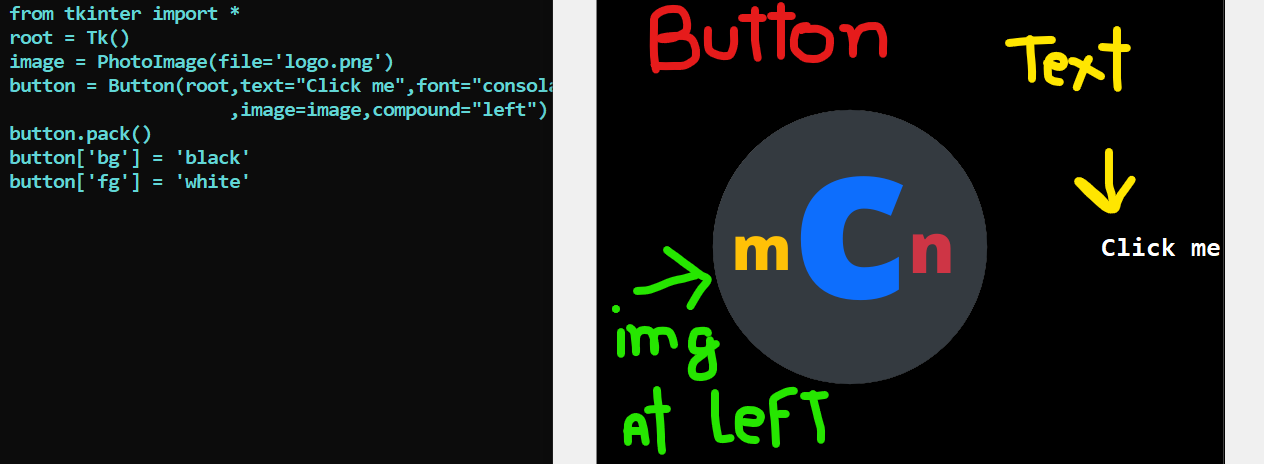
Adding a photo/image
Loading the image
myImage = PhotoImage(file="filepath")
# Note: You need to check for the type of image
# Png images are allowed and rest you need to check.
# There are more ways to use different kind of images.
# One of which can be by using pillow module
Now you can use the image in label,button,and other widgets.
# For example
Label(master,image=myImage).pack()
Button(master,image=myImage).pack()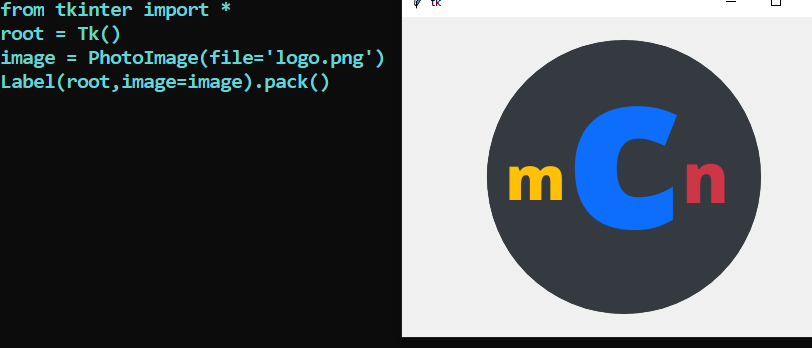
Use of compound to display both text and image
You can also display text and compound in widgets to display both text and image.
compound can be bottom, center, left, none, right, or top
Just specify the compound="any of the above options" in the **options of the widget.
For example: setting compound='left'
will place the image in left.
Some useful methods
Wait Window Method
This method is used by widgets.
Whenever this method is called (usually in a function)
the code written below it is not processed until
the widget (which calls it) is destroyed.
Note: the GUI will still be usable
#Example:
#Suppose this is your piece of code
from tkinter import *

def AppendText():
    Label(myFrame,text='gui is still usable').pack()

def Destroy():
    myFrame.destroy()

root = Tk()
root.title("myCODEnotein is the best")

destroy = Button(root,text="Destroy the frame",command=Destroy)
destroy.pack()

append_text = Button(root,text="Append text to frame",command=AppendText)
append_text.pack()

myFrame = Frame(root,bg="red")
myFrame.pack(fill=BOTH,expand=True)

myFrame.wait_window()

print("I will be printed after the frame destroyed")

root.mainloop()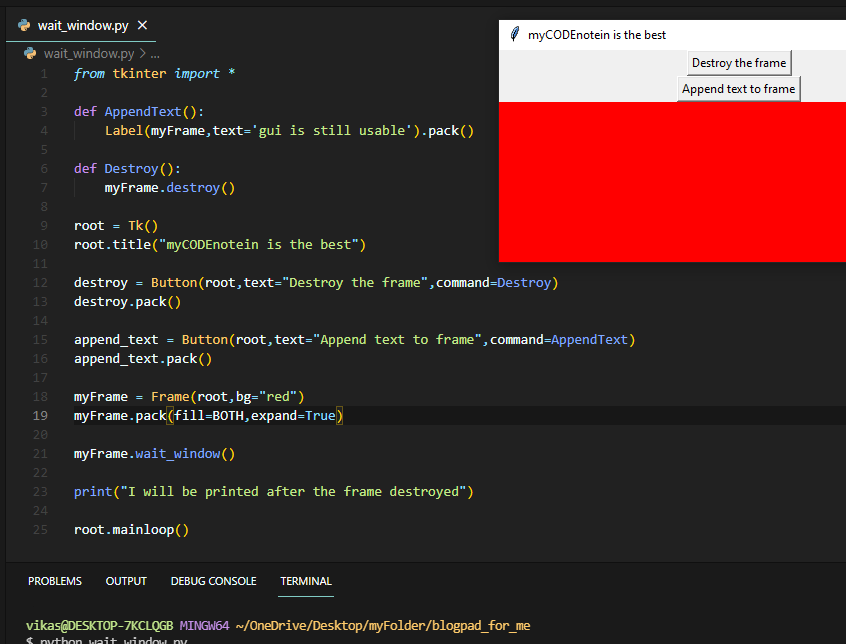
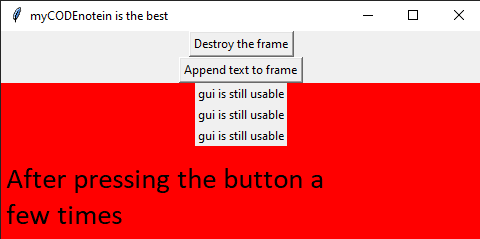
Whenver user destroys the frame the line below it
will be executed.
